
Advanced PHP application development on a MacOS localhost for mere mortals
This is intended as a cozy guide you spend a day or two digesting (it’s only 10,000 words nbd), but the following table of contents will speed you on your way to get down to business or use it for reference. Send feedback on this guide (corrections, misunderstandings, and leaps of logic) to me.
Table of Contents
- Front Matter
- Installation Guides
- MacOS Stack (MacOS, Homebrew, git, zsh)
- Web Stack (MariaDB, PHP, Apache, dnsmasq, ngrok)
- Dev Stack (Composer, XDebug, PHPCS, PHPStorm)
- Appendices
Changelog
- v2.1, Jul 2025: Reworked order & Table of Contents to separate stacks. Moved & edited Changelog. Retitled and fixed contact info.
- v2, Dec 2021: Added Apache (nginx → Appendix D), SSL support, a note on Apple Silicon, and a digression on shell loading (“z-what?”). Fixed hard-coded hostname in zsh prompt.
- v1.1, Dec 2020: Added Redis (in Appendix A), XDebug 3.x (IDE Tooling), & localhost diagram. Rewrote rationale for nginx.
- v1, Nov 2020: Original guide.
Preamble: Why this exists
PHP is a great language for beginners and seasoned developers alike because its onboard is so approachable. Yet, it remains very challenging to setup and maintain a professional-grade localhost. Increasingly, we sidestep this by adding “magic” automation, but this exposes a new cost when it breaks in mysterious ways that are difficult to Google.
I don’t like that cost, and I think it’s widely underestimated. I’m not suggesting “pain is gain” or even that the experience of building your own stack is particularly formative. But I do believe stack management is unavoidable, and ultimately the only way out is through it. Deferring it isn’t sparing you, it’s just shifting the challenge and making it loom larger later.
Well before my first full time development gig, more than 15 years ago, I was given two critical gifts. The first was a spare Pentium II box on which I could build a “proper” LAMP stack (I wasn’t using a Mac in those days, it was XAMPP on Windows). The second was a custom 7-page guide on how to do that. The Internet is great for many isolated technical solutions, but even then it was rare to find a comprehensive guide that spelled out the process from start to finish, making it very difficult to wrap your head around. Printing a hard copy of that guide was possibly the most vital thing I did for my budding career that year.
There is precious little about that original LAMP stack guide that would be relevant today. Literally every step, every piece of every step, is different, and generally for the far better. But what hasn’t changed is how difficult it is to find that one great source to get the whole way thru it.
This guide will start decaying in relevance the moment I finish editing it, but for one brief moment I hope it helps a great many web developers. I’ll certainly use it for reference myself before a year passes because it’s impossible to hold all this in your head at once no matter how senior you are.
I’m including a great many things in this guide that I’m sure some developers will turn up their nose at and question why anyone would do it that way, use that tool, explain it that way, not refer you to the docs, and so on. My parting wisdom is: Fuck that noise. Web development needs to be for everyone, not just people who learn or think in one particular way. This is the way that makes sense to me, and I bet there are more of us than of them. This is hard-won knowledge, some of it gained embarrassingly late in my career as something finally clicked that I didn’t know enough to even ask about earlier. Take your time, follow every loose thread, ask about underlying concepts, and don’t worry if it takes you two weeks at work to set up your localhost. We’ve all been there.
Introduction: What we’ll cover
This is a guide for folks who just want to load the best PHP toolchain onto their MacOS laptop without using magic so they can inspect the entire thing, troubleshoot it, and understand it. That means no Vagrant, no Docker, no Valet, no Homestead, No Flywheel / Local — nothing meta that takes over your machine. If you wanna skip to development without touching your stack, go for it. This ain’t that guide. Therefore, I also don’t recommend this guide for beginners. A beginner should use MAMP to get started, for real.
We’re going to build a local development environment using:
- PHP (duh)
- Apache (we’re back, baby)
- MariaDB (or Percona or MySQL)
- dnsmasq (painless, I promise)
- mkcert (wildcard SSL certs!)
- Ngrok (tunneling service)
- PHPStorm (the best IDE for me) & Querious (a database GUI)
- XDebug & PHP CodeSniffer (PHPCS)
- git & Composer
- WordPress
- Homebrew
- bash or zsh
Did I forget anything? Probably. It’s complicated! If you’re not familiar with a couple pieces, no sweat, we’ll introduce each piece as we go.
Lots of it is optional; do the parts you need to get where you’re going and come back when the rest becomes relevant. Never build a localhost more powerful than what you need! They don’t last forever.
But what’s the goal here? What’s the “acceptance criteria” of getting thru all this madness? Well, it’s quite simple. We’re going to build a system that allows you to instantly create any site ‘foo’ (where foo is a placeholder for anything you’d want to name a site) such that:
- The site lives in
~/sites/foo. (On a Mac,~is a functional abbreviation for the path to your home directory at/Users/<username>.) - The address is
foo.test. - The data is stored in database
foo. - The code lives under
~/codeorganized in its own git repos, independent of the site structure.
And we’re going to hook it up such that creating that folder & database are the only steps required to create a new site. It will “just work” from there. And importantly, we’re going to sync ALL your sites to one central source of truth for the code, so checking out git branches updates everything for testing across sites.
We want all the trimmings: the debugger, the linter, and our other tooling, all tied into our IDE, making it just a sweet, sweet experience to build what we need without extra steps or gotchas. We will be covering how to switch between versions of PHP. We won’t be handling SSL in this workflow, but I’ll likely amend it to do so in the future.
Yes, we’re going to use WordPress for the sites we make. However, you should be able to generically use this for any number of PHP applications with a few minor app-specific tweaks.
Words of caution
We’re gonna start from scratch. Something is absolutely going to go wrong, because no one truly ever starts from scratch. For instance, MacOS already has a copy of PHP that ships with it, which complicates things if you want to follow a complex guide like this. And every localhost has some weird customization or tweak that’s gonna make some part of this fail, or the next version of {fill in the blank} will ship the day after I publish this and change something. This guide will account for as much of that as possible, and I’m gonna link to more resources as we go, but if you get thru this without opening Google, it will be a miracle to record in your diary.
And that’s why we’re going to start here: basic concepts, in the next sections. If you don’t understand how this mess hangs together, the subsequent Google-fu is gonna make you so, so very frustrated. It’s worth the time to read it.
File paths may differ depending on whether you have an Intel or Apple Silicon (M1) Mac, especially in the Apache section. This guide favors the latter. This other guide may help navigate the differences.
Lastly… you saw where it said “localhost” right? Don’t do this on any kind of public-facing server. Don’t use your localhost to serve any content publicly, ever. Red flag. Hard no on all of that. Seriously. We’re not building a secure environment, we’re building a convenient one. We also critically are assuming you have your own laptop and aren’t sharing it with anyone else.
Tool overview
I’m going to take detours to tell you about even more tools than this, because I think it’s super important you understand the system rather than just each piece. The connections between them are every bit as important and frequently overlooked in technical guides. But, we need to start somewhere, so here’s the core bits we’ll talk about at length.
PHP is the heart of this whole shebang. It’s why this guide is constructed the way it is: to get stuff in and out of PHP as efficiently as possible.
Apache HTTP is the OG. Generally referred to as simply “Apache” (since it gave the Foundation its name and not vice versa), it’s been the most popular web server since 1996.
PHP-FPM is essentially a daemon (think “listening service”) for PHP. FPM is “FastCGI Process Manager” (yes it’s acronyms all the way down, let’s just stop there — it doesn’t matter). Most web servers need a place to forward PHP-based requests for processing. That means you’ll need PHP not just installed, but actively listening for calls from the web server. This is what PHP-FPM does: accepts requests, runs them thru PHP, and sends back the result. (Note that Apache does have a built-in module that replaces this component, but we’re going to set this up like we would Nginx or any other web server and use PHP-FPM instead.)
MariaDB is the reigning champ of relational databases (unless you’re super in love with Postgres, which means you don’t need this part of my guide anyway so calm down). MariaDB is the spiritual (and literal) successor to MySQL, which Oracle took over in extremely Oracle-like fashion a great long time ago. Percona is a very nice enterprise fork, whose main claim to fame (in my mind) is its very nice backup tooling. They are interchangeable for our localhost needs, so that’s as many bytes as I’ll consume discussing them. You do you.
dnsmasq we’ll use for exactly one thing: reserving the .test top-level domain (TLD) for your localhost, so you can create an infinite number of sites without needing to manually edit /etc/hosts every time you create one. (Your HOSTS file overrides public DNS by providing an IP address for individual domains. This is an excellent detour to take if you’re unfamiliar.)
mkcert fast-forwards us past a hurdle I dreaded adding to this guide for more than a year. It adds wildcard SSL (HTTPS) support to our localhost, perfectly in sync with dnsmasq without adding a bunch of complexity overhead.
ngrok (“en-grok”) is a tunneling service that will forward web requests to your localhost, making it accessible from the Internet. We’ll only touch on it briefly, and it’s lightly dangerous, but it’s a very powerful tool when you need it.
PHPStorm is how we’ll edit our code. It’s generally regarded as the best PHP integrated development environment (IDE). I know, there are several great alternatives. You do you! But this guide is going to concentrate on PHPStorm, both because of its ubiquity and its unintuitiveness. It really is an endless rabbit hole of configurations you didn’t know to look for, but that’s also why it’s likely the most integrated of the IDEs.
XDebug is our premier PHP debugging tool. Listen, some days you just gotta var_dump(), I get it. But when it’s time for more, XDebug is the big guns. It’s the god mode of debugging. Without it, you’re guessing & checking, which is fast but limiting. We’ll also grab PHP CodeSniffer (PHPCS) as a linting tool to keep an eye on our coding standards. Best to get acquainted now if you haven’t yet. Both of these tools we’ll wire into our IDE very tightly because they’re huge time savers.
git will be our version control, and Composer our dependency management tool. I feel like those are gimmes. These both interface with our IDE, but in less vital ways. I primarily use both via command line interface (CLI) because I think it’s easier to keep track of what’s going on that way, so we’ll talk about these as CLI tools and you can explore their IDE abilities on your own.
WordPress is the most popular PHP soft—… actually it’s just straight up the most popular web software in the world, so it feels like a great candidate to be our stand-in for whatever app you wanna use. It’s also a tremendous entry point into the PHP ecosystem for thousands of developers, a little bit persnickety, but also fairly straightforward conceptually, so it’s just the best candidate for this guide in every respect.
Homebrew will be the one piece of magic we indulge in this guide because its proven itself to be indispensable, vital magic for a brutal part of the process: installing the potentially unwieldy chain of dependencies for our core stack: PHP, Nginx, MariaDB, and dnsmasq. Compiling all that stuff is otherwise its own guide, for real. It’s just ace dependency management for the Mac, and frankly is a huge competitive advantage for why I’d recommend web developing on a Mac.
vi is my text editor of choice. It needn’t be yours. Whenever you see “vi ___” in the instructions, just know I’m opening the file for editing. You can do this with TextEdit (by finding the file in Finder) or whatever tool you like. I always just describe how to edit the file; I won’t bore you with vi commands you probably will never use again; personally I think it’s a great tool to know, and that it wouldn’t be a waste of time to slog thru doing it with vi (via copious googling).
Well that was exhausting to write and we haven’t even started yet.
Workflow overview
When we’re done, you’ll go to your browser and type http://foo.test into your browser. dnsmasq will route this request (rather than attempting to let public DNS find it) to 127.0.0.1, your localhost. nginx will be listening on port 80, which is what your browser used by default. Its config will tell it the matching site’s root folder is at ~/sites/foo, and to use index.php as the default (index) since no particular file was specified. It will pattern match index.php as a PHP file, so it’ll route the request to the PHP-FPM gateway via a Unix socket, where it’s listening as a daemon.
PHP-FPM will execute the index.php script by passing it to PHP, which is listening on port 9000. Using WordPress as our example, it will connect to the database (MariaDB) using the information in wp-config.php and include the rest of the PHP files needed to run. If you have XDebug integrated with PHPStorm and you’ve set a breakpoint within WordPress’s files, they’ll be communicating over port 9001 to pause execution while you observe its state. (Note that PHP is still “running” and hence the request to PHP will timeout if you wait 30 seconds and nginx will reply with a gateway error in your browser.)
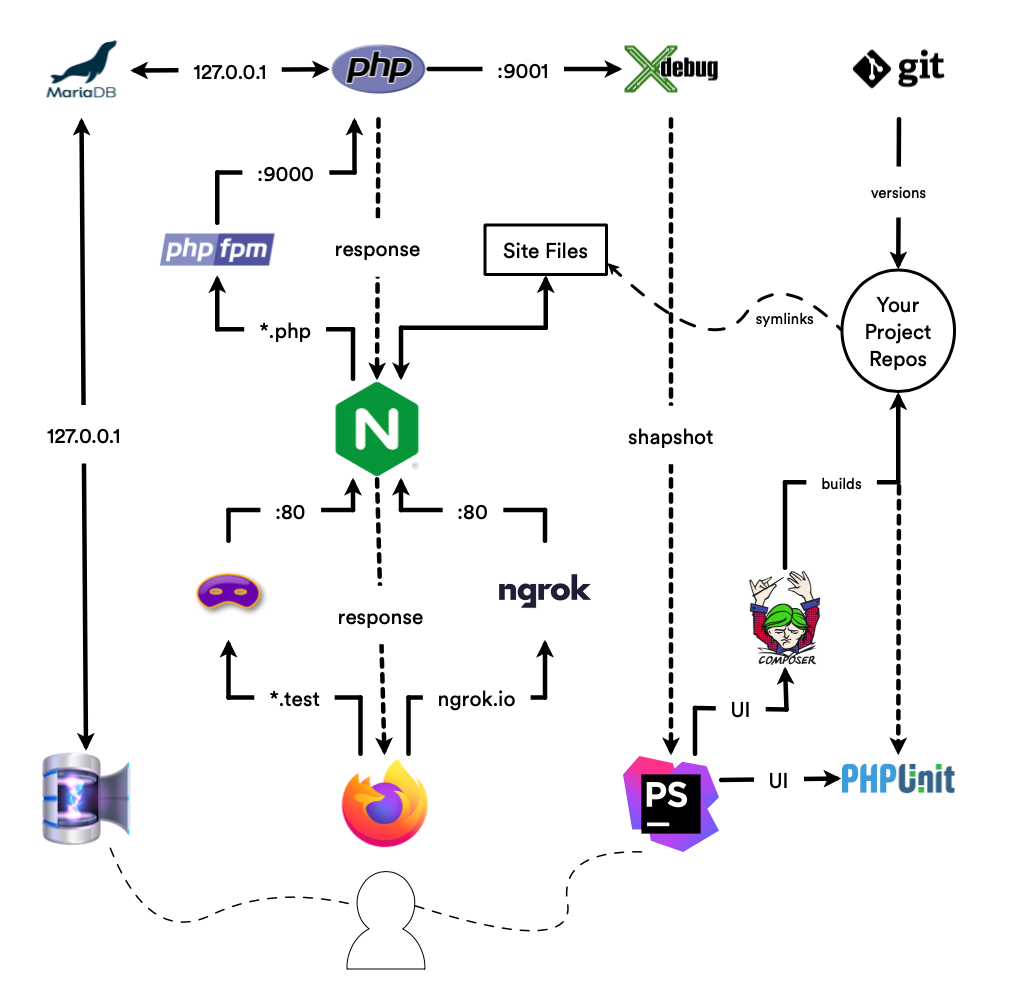
I replaced nginx (the ‘N’ logo) with Apache HTTP in Dec 2021, but it’s otherwise the same.
Installation: MacOS Stack
Embrace simplicity
This is where we talk about making your CLI tooling the best it can be, since nearly everything else we do here will rely on it. Let’s start with a few “basic truths” of these tools:
- They almost always provide 2+ ways of installing them (Homebrew, phar, Composer, etc).
- Managing your PATH (the ordered list of folders your system will search to execute a command) can be a pain (and advice given about how to do it is usually pretty bad).
Here’s how I suggest dealing with them:
- Prefer using the Homebrew (or Composer) version if possible. Installing the phar is easy up front and conceptually simpler, but when the next version comes out you may have a rough time without dependency management.
- Manage your PATH by editing
/etc/paths, not dotfiles (e.g..bash_profile) or other stuff that turns into the world’s most illegible collection of concatenated strings. Do this as little as possible.
Just doing those two things consistently will spare you a bunch of headaches. (Call it an axiom of all things technological: The root of all complexity is inconsistent decision making. Prioritize simplicity or suffer.) In this guide, we’ll do both of these things: We’ll prefer phars, and we’ll only modify your PATH once (for Composer).
Prepare MacOS: Pull back the curtain
First we’ll want MacOS to take off the training wheels and let us see everything.
Show all hidden files
- Open Terminal
- Run these two commands (pressing Return after each)
defaults write com.apple.Finder AppleShowAllFiles truekillall Finder
Show all file extensions
- Finder → Preferences → Advanced
- Check the “Show all filename extensions” box
Show the Develop menu and full addresses in Safari
- Safari → Preferences → Advanced
- Check the “Show full website address” box.
- Check the “Show Develop menu in menu bar” box.
Know your username (will be important later)
- Open Terminal
- Run this command
whoami
Shell: bash or zsh
Let’s start with your shell. You’re likely using bash (older Mac) or zsh (newer Mac) unless you set it manually. I don’t wanna yuck your yum, but if you’re using this guide you probably don’t wanna use something else anyway. To vastly oversimplify the differences: bash has a ton more scripts available via Google because it’s older, and zsh has a few nice value-adds like being able to auto-complete git branch names (which… is huge).
I suggest sticking with what you’ve got, and I’ll try to provide instructions that work for both. Whenever I provide commands, I assume you’re using the Terminal app (iTerm is also nice). It’s indispensable; put it in your dock.
To be sure which shell you’re using, use: echo "$SHELL"
When you open a new Terminal window, it runs a file in your home directory to set customizations for you. For bash, that file is ~/.bashrc and for zsh that file is ~/.zprofile. We’ll use these more later.
You’ll definitely need to know your MacOS password, of course, and I highly recommend one that isn’t frustrating to type because you’ll need it every time you use sudo before a command (executing it with root permissions), like will be required for restarting nginx.
Preparing folders
Once upon a time, you could add folders to the root on a Mac and life was good. What more could you ask for than super-short paths? Alas, that is no longer the case and we’ve been cast out to the home directory. Feel free to use your own naming conventions, but I prefer: ~/code, ~/sites, ~/hooks, & ~/logs. Yes, I see all the other folders in the home folder are capitalized; I don’t care, I don’t wanna hit shift all the time and it makes your custom ones stand out better anyway.
We’ll use code to store git repositories, sites for our web roots, hooks is for our global git hooks, and logs for… that. Again, you can name them anything and put them almost anywhere, but this is the convention we’re using in this guide so you better remember what you did.
That said, bin is a system convention you shouldn’t mess with or it won’t work. It’s where we’ll put a few scripts later.
Do this in Terminal:
cd ~mkdir bin code sites hooks logsAll set.
Locate
If you’re a master of the find command skip this section, but for everyone else I’m gonna tell you about a secret utility that’ll make your life much better: locate. At the command line, type locate php.ini and hit enter. If it just works, cool, skip ahead. But it’s more likely gonna tell you the locate package wasn’t found, but here’s how to install it, and give you a command. Copy/paste that and install it. (This is optional. Nothing else in this guide relies on it.)
The locate command is a simpler, faster find that automatically builds an index of all the files on your local hard drive. When it’s done (give it a few hours), you’ll be able to use commands like the above example locate php.ini to figure out where the hell that stupid config file wandered off to. It just does straight matching, nothing fancy, but super easy to use and I recommend it to anyone who will listen. You can’t forget the syntax because there is none.
Homebrew
Homebrew provides dependency management for MacOS. Most of our core stack (especially various PHP extensions) will have dependencies and it would double the length of this guide to resolve it all manually. It’s like the Composer of MacOS.
To install it, open Terminal and enter:
/bin/bash -c "$(curl -fsSL https://raw.githubusercontent.com/Homebrew/install/master/install.sh)"Follow the bouncing ball and keep its defaults. It will install in /usr/local and use that as the starting point for everything else it installs.
Another nice thing about Homebrew is that it handles the install of Xcode CLI tools, which are an important prerequisite you otherwise would need to create an Apple developer account to download, or install from the command line separately with xcode-select --install which the Internet tells me is a bit hit-or-miss depending on MacOS version these days.
git version control
Time for some version control! Install git with: brew install git and then confirm it worked with git --version (should return the version number).
Immediately configure it with (substituting your real details — preferably using an email attached to your GitHub or GitLab account):
git config --global user.name "Your Name"
git config --global user.email "you@example.com"
git config --global pull.rebase false
Easy peasy. If you’re wondering, the last one auto-merges when you pull, which is the default behavior anyway, it just chirps at you every time if you don’t explicitly set it. Keep in mind that email address becomes de facto public if you use a public repository.
Centralized hooks (optional)
I recommend holding off on this during your initial setup unless you know rebuilding Composer between branches is gonna be a pain. My particular hell is switching branches and having my app crash in a new mysterious way because I forgot the dependencies or the autoloader changed in the other branch. To remedy that, we use a global git hook that rebuilds Composer’s dependencies every time we checkout a new branch.
In Terminal, we tell git where to look for global hooks & create one:
git config --global core.hooksPath ~/hookscd ~/hooksvi post-checkoutRemember, you don’t need to use vi! Feel free to just create a file called post-checkout (no extension!) in Finder and open it for editing instead. Add this as the file contents:
#!/bin/sh
composer install
Then in Terminal, give MacOS permission to execute the file:
chmod +x post-checkoutIf you want to get even fancier with your hooks, check this out.
git aliases for the CLI
I prefer using git from the command line for one reason: it’s faster. To make it even faster still, I employ some aliases for common commands. Here’s what I put in my ~/.zprofile or ~/.bash_profile to enable them.
alias g='git status'
alias ga='git add'
alias gaa='git add . -A'
alias gb='git branch'
alias gc='git commit'
alias gcc='git commit . -m'
alias gd='git diff'
alias gdt='git difftool'
alias gp='git pull'
alias gps='git push'
alias gl='git log'
alias gr='git remote'
alias grs='git reset'
alias gk='git checkout'
alias gcp='git cherry-pick'
alias gs='git stash'
alias gsp='git stash pop'
alias gf='git fetch'
alias gt='git tag'
alias gi='git init'
A few notes.
gccrequires a message in double quotes following it and commits everything.gaais equally broad: it adds everything for your next commit.- You should set up a difftool. I recommend Kaleidoscope.
Don’t forget to restart Terminal after adding them.
git undo
The command to “undo” a commit is a handy tool. What you want is to revert the commit but re-stage it so you don’t lose the changes. The command for this is git reset HEAD --soft which is a bit long, so try this command at the CLI:
git config --global alias.undo 'git reset HEAD --soft'Now git undo will undo your last commit and re-stage the changes for you. You can name it whatever you want!
Ports: What’s listening?
We’re going to use a bunch of tools that listen on specific ports. Trying to determine whether something is actually listening or not is very key piece of troubleshooting the system. Use this Terminal command for a list of what’s listening on what port:
lsof -i -P | grep -i "listen”We’ll do this quite a bit.
You can also see what services brew is currently managing and their state (started/stopped) with brew services.
Prompt: Where am I?
Customizing your shell prompt can be hugely helpful. I find the default very frustrating by comparison. My preferred format is:
[user@host folder:git-branch]#
The git branch is only present when in a git-enabled folder, otherwise it’s blank. There are many variables if you’d like other information in your prompt. I only use the current folder, not the entire path, because I prefer compactness. Customize it how you like!
To use my prompt in bash, add this to your ~/.bashrc file as its own line and then restart Terminal:
PS1=“[\u@\h \W:\$(git branch 2>/dev/null | grep '^*' | colrm 1 2)]# “Everything from the \$ thru both parenthesis is the git-specific bit. Remove the entire thing if you don’t want that.
To use my prompt in zsh, add this to your ~/.zshrc file (create it if it doesn’t exist with: touch ~/.zshrc) and then restart Terminal:
# Load version control information
autoload -Uz vcs_info
precmd() { vcs_info }
# Format the vcs_info_msg_0_ variable
zstyle ':vcs_info:git:*' formats '%b'
# Set up the prompt (with git branch name)
setopt PROMPT_SUBST
PROMPT='[%n@%m %1~:${vcs_info_msg_0_}]# '
Use pwd to get your full current path. Use which {command} to figure out where the command you’re using lives. This is especially helpful for making sure you’re using the copy of PHP you think you are. Try this:
which phpMy z-what-now?
You may have noticed I just told you to put the prompt in .zshrc, but the git aliases in .zprofile (or the bash equivalent). Why? For 99% of use cases it honestly doesn’t matter. The .zprofile gets loaded first and only for logins while the .zshrc gets loaded for any interactive shell. But if you’re always using Terminal you’ll always get both loaded. In the wider Unix world, it matters more. If this is the sort of esoteric rabbit hole you enjoy, you’re in for a treat. Otherwise, ignore it.
On a new MacBook Pro as of 2021, you’ll have a .zprofile but not a .zshrc by default. Just use touch ~/.zshrc to create the latter. It’ll get picked up and used automatically.
PATH
The “PATH” is actually a list of places your system looks for a command before giving up. So when I type whoami, it goes and looks for an executable called whoami in a short list of places and uses the first one it finds. Lots of guides tell you how to edit your bash profile to add stuff to your PATH. This is nuts, because there is an easy-peasy text file you can edit instead that is foolproof.
It’s at /etc/paths.
Just open that file and add anything you need in your PATH as a new line. Save it, and restart Terminal for it to take effect.
Here’s my /etc/paths file with by personal bin, Composer & Pear added (I don’t have Pear in this guide so you can skip the last line if you’re not using it). Don’t forget to substitute your own username! You ain’t linc.
/usr/local/bin
/usr/bin
/bin
/usr/sbin
/sbin
/usr/local/sbin
/Users/linc/bin
/Users/linc/.composer/vendor/bin
/Users/linc/pear/bin
Installation: Web Stack
The rest of our traditional LAMP (Linux, Apache, MySQL, PHP) stack! Well, technically “MAMP” for today (MacOS). People love reinventing this acronym but they’re just trading on its OG star power which exists for good reason: It’s reliably awesome and constantly getting better.
MariaDB
First, install it with:
brew install mariadbThen, set it as a service:
brew services start mariadbPreviously, it simply created a root user with no password. As of MariaDB 10.4, the default authentication changed so we have a couple extra steps now. (As of this update, 10.6 was the version Homebrew installs as stable.) Start using it with:
mysqlThat will give you near-root access from the command line.
To connect to it with an app (like Querious) just use the “Unix socket” connection option and your current system username (so “linc” for me). No password is needed.
If you need full root for some reason, use sudo mysql instead to connect at the CLI, or use the “Cookbook” section in the linked notes above to revert to the older authentication method.
If you’re stuck in MySQL at the CLI now and don’t know what to do, just type exit; and hit Return.
PHP
First, try this: php -v. You may get back PHP 7.3 or below. This is the default copy of PHP that comes with MacOS prior to 2021. This is the bad copy we don’t wanna talk to. Try which php and you’ll likely get /usr/bin/php if you haven’t already messed with your localhost previously. If you got back “command not found”, that’s good and fine.
Install the newest PHP with: brew install php.
As of Dec 2021, that will install PHP 8.1. You can install specific versions (and yes, you can have many versions at once!) by using brew install php@7.4 etc.
Now try php -v again. You may still see the old version. That’s because while Homebrew has indeed updated everything to use the new version, it won’t take effect until you restart Terminal. Close your window and open a new one if needed.
Now do php -v again and see the new version. Type which php to see the path, which will likely be /usr/local/bin/php (notice the ‘local’ in there, now). This is actually just a symlink to the copy that Homebrew installed.
Now we just need PHP-FPM to start listening on port 9000, which is the default. To do this: brew services start php.
If you wanna install multiple versions and then explicit choose one to use, you can do it this way:
brew install php@5.6
brew install php@7.4
brew link php@7.4
And this is the magic part: You can brew link php@x anytime you wanna test a different version of PHP! It’s fast and easy!
Homebrew & shell: More on linking
You’ll recall (if you saw all the text flying by) that Homebrew set the newest PHP as the “linked” copy, which means when things generically request “PHP” they’ll get that version. To switch versions, you “unlink” the current one and “link” the different version. “Link” in this context is literally referring to which version is being symlinked as /user/local/bin/php.
This is a very important conceptual point when you start debugging a problem in your localhost. “Installing” multiple versions of a thing in Unix don’t interfere with each other because there’s literally just a symlink telling the system which version to invoke when you generically call something like php. The universal symlinks (stuff on MOST systems) go in /usr/bin and personal symlinks (stuff on YOUR system) go in /usr/local/bin. Stuff in /usr/local/bin takes precedence over stuff in /usr/bin.
Why is that? The order of precedence for where to find commands in the file system is in the simple text file /etc/paths. Check it out! Try cat /etc/paths to dump its contents. We’ll come back to this later.
To see which items are symlinks in /usr/local/bin and where they point:
cd /usr/local/binls -laApache HTTP
The service that runs Apache is called ‘httpd’ for “HTTP daemon” — a daemon being any continuously running program. Basically, it’s existed so long it’s like the reverse-Kleenex of web servers and its process is just named for what it does rather than its brand. Anywhere you’ll ever see “httpd” it means Apache.
Let’s start nice and easy:
brew install httpd
sudo brew services start httpd
You can confirm you got this far by visiting localhost:8080 in your favorite browser. You’ll see “It works!” if it’s running.
Unfortunately, we need it running on port 80, not 8080. It runs on 8080 at install because that port isn’t as locked down; it can’t use 80 automatically because of security concerns (e.g. spyware turning your laptop into a web server without you knowing). But before we start configuring a word on PHP.
PHP Request Handling
Apache has two ways to integrate with PHP. The first is like nginx does, which is to pass requests to PHP-FPM. It’s a very standard request hand-off like you’d find in most ecosystems. The other is the tailored PHP module for Apache. They were the original shipped couple. (Yes that’s me using 2015 Zoomer slang to make a dad joke 5,000 words into this guide, thank you!)
Folks generally recommend the more standard PHP-FPM route these days, and since this guide is about avoiding magic and keeping our tooling transparent (and we just installed PHP-FPM), we’ll favor that as well. A nice side benefit is that this is also the better-performing method if you ever find yourself needing to set up a production web server. (Reminder/disclaimer this is extremely not a guide for setting up anything other than localhost.)
Apache Main Config
Apache’s configuration file will be at /opt/homebrew/etc/httpd/httpd.conf. I’m going to go thru the changes in the order you’ll find them in a default conf.
vi /opt/homebrew/etc/httpd/httpd.confWe’re going to change many things in here.
First, near the top, we’ll set the ServerName (just so Apache doesn’t chirp about it) by changing this:
#ServerName www.example.com:8080to this (removing the ‘#’ uncomments / makes it active, and we give it a more sensible name):
ServerName localhostSecond, we change the port as we mentioned above. Not much farther down the conf, you’ll find ‘Listen 8080’ which you’ll change to 80, the standard web port, and add 443 for SSL (HTTPS connections):
Listen 80Listen 443Next, further along the conf, you’ll find the User and Group names that Apache will run as (for permission purposes), likely set to _www. You’ll want to set these to your own username and ‘staff’, respectively:
User linc
Group staff
Trying to manage file permissions without that change will turn into a nightmarish hellscape, trust me on this one.
Next, enable the modules we need for PHP-FPM: proxy_module, proxy_fcgi_module, , vhost_alias_module, and mod_rewrite. Find these lines (mixed among the LoadModule commands with mod_rewrite likely at the end) and delete the ‘#’ to uncomment them like this (they don’t need to be consecutive, just leave them where they are):
LoadModule proxy_module libexec/mod_proxy.so
LoadModule proxy_fcgi_module libexec/mod_proxy_fcgi.so
LoadModule vhost_alias_module lib/httpd/modules/mod_vhost_alias.soLoadModule rewrite_module lib/httpd/modules/mod_rewrite.soLoadModule ssl_module lib/httpd/modules/mod_ssl.soNext, we’ll modify the DocumentRoot and the Directory declaration right after it:
DocumentRoot "/Users/linc/sites"
<Directory "/Users/linc/sites">Then, tell Apache to allow/handle PHP index files by finding this:
<IfModule dir_module>
    DirectoryIndex index.html
</IfModule>
and changing it to this:
<IfModule dir_module>
     DirectoryIndex index.php index.html
</IfModule>Then, find & edit the ErrorLog location:
ErrorLog "/Users/linc/logs/error_log"You could call it “apache_error_log” or something if you want, I just have the default names for the various programs’ logs memorized and prefer to leave them.
Finally, include the vhosts file by deleting the ‘#’ before the word Include here, like this:
# Virtual hosts
Include /opt/homebrew/etc/httpd/extra/httpd-vhosts.conf
Alright, you’re clear to save that config now. (If you restart Apache at this point, which isn’t necessary, you may get a chirp warning you about the DocumentRoot because you haven’t done the next section yet.)
Virtual Hosts
Now we want to set up Apache to serve from any folders you put in the ~/sites directory. Start by opening that vhosts file for editing:
vi /opt/homebrew/etc/httpd/extra/httpd-vhosts.confThere will likely be two blocks of VirtualHost configurations in there. We’ll only need one, so delete the other entire block (the last 7 not-blank lines in mine).
In the remaining block, change the first line to listen to port 80 instead of 8080. The inner stuff we’re gonna change pretty radically, including removing a few lines, so I’ll just give you the final product and then discuss it.
<VirtualHost *:80>
    ServerName linc.test
    ServerAlias *.test
    VirtualDocumentRoot /Users/linc/sites/%1/
    LogFormat "%v %h %l %u %t \"%r\" %>s %b" vcommon
    CustomLog "/Users/linc/logs/access_log" vcommon

    RewriteEngine On
    RewriteCond %{HTTP_HOST} ^([^.]+) [NC]
    RewriteRule ^/(.*\.php(/.*)?)$ fcgi://127.0.0.1:9000/Users/linc/sites/%1/$1 [P]
</VirtualHost>
Note there are FOUR things you need to customize in there — once again, you ain’t linc. Also, the ServerName can be any .test domain you like at all, it just needs a default and you can’t use a wildcard for it.
There are guides out there that will advise you to use ProxyPassMatch for handing off PHP requests. That’s fine, and probably what you want in production, but it doesn’t work for this particular setup because we need to dynamically assign it to subfolders based on the domain, which that directive cannot do (basically you can’t put the %1 in a ProxyPassMatch directive). Instead, we use an old school Rewrite with the proxy flag ([P]).
We’re also using a TCP port (9000), not a Unix socket. This boils down to preference; I can think of scenarios where a TCP port is preferable but not ones where a Unix socket would be, so I use the former.
Wondering what that RewriteCond is doing? I sure did when I first saw it. It’s just re-capturing the %1 pattern for the Rewrite module. It’s not actually gating anything.
Allowing Secure Connections
Disappointingly, there’s no wildcard or dynamic path interpolation for SSL certificate paths in Apache’s conf. That means, unlike the single virtual host above for HTTP, we need to create a separate virtual host block for every site we want to use with HTTPS.
For now, we’ll just set up one. You’d need to copy & paste this entire block (editing it for ServerName and the SSL paths) to add more later. Note we are speculatively setting paths for certs that don’t exist yet. We’ll create those in the mkcert section below.
You can just put this right below the VirtualHost block above (in httpd-vhosts.conf).
<VirtualHost *:443>
    ServerName linc.test
    DocumentRoot /Users/linc/sites/linc/
    LogFormat "%v %h %l %u %t \"%r\" %>s %b" vcommon
    CustomLog "/Users/linc/logs/access_log" vcommon
    SSLEngine on
    SSLCertificateFile  /Users/linc/sites/linc.test.pem
    SSLCertificateKeyFile /Users/linc/sites/linc.test-key.pem
    RewriteEngine On
    RewriteCond %{HTTP_HOST} ^([^.]+) [NC]
    RewriteRule ^/(.*\.php(/.*)?)$ fcgi://127.0.0.1:9000/Users/linc/sites/%1/$1 [P]
</VirtualHost>
Sorry, now you have NINE lincs to edit out. Just keeping you on your toes.
After you save that, you’ll wanna restart Apache finally. But maybe read the next section first.
Apache Commands
Conf changes require a restart to take effect. It can be helpful to verify your changes before attempting that (the last command below) so your server doesn’t end up stuck ‘off’ while you figure out what you did wrong.
To my knowledge, it’s functionally equivalent to use brew services httpd [stop|start] or the below ‘apachectl’ commands. I also use ‘apachectl’ in other environments so I tend to use those.
- Start: sudo apachectl start
- Stop: sudo apachectl stop
- Restart: sudo apachectl -k restart
- Show loaded config:
apachectl -S - Verify config syntax:
sudo apachectl configtest
The best possible output of that last one is a simple “Syntax OK”.
Debugging Apache
Add this to httpd.conf (if there is an existing LogLevel set, delete or replace it):
LogLevel trace4
GlobalLog /Users/linc/logs/debug_log "%v:%p %h %l %u %t \"%r\" %>s file=%f"
This will give you better ability to figure out where, exactly, Apache is looking for things. You’ll probably want to undo it when you’re done. That log file may get big fairly quickly if you’re using your localhost server regularly.
Logging (PHP & Apache)
Logs are a pain to setup to be useful, but you’ll pay the price if you do the easy thing and skip it.
- Use the
tailcommand to quickly see the lastnlines of a log. Example:tail -n50 ~/logs/error_logto see the last 50 lines of Apache errors. - Always check the timestamps! Man, this is gonna burn you someday regardless of how many times I say this, but always check the timestamps.
- Confirm you have the full error. The
tailcommand doesn’t care if it gave you a full error, it’s blindly pulling X number of lines. When in doubt, increase the number of lines. - There are ways to configure how much or little is put into the logs, and their formatting. I leave this to you as a sidequest if you desire.
I enjoy setting an alias to tail my PHP logs specifically. In my .zprofile (or .bash_profile) I add this and restart Terminal:
alias wtf='tail -n50 ~/logs/php_errors.log'Now I type wtf and get… well, the answer.
dnsmasq
Very simply: brew install dnsmasq
Now we need to make a quick & easy config file:
- sudo
vi /opt/homebrew/etc/dnsmasq.d/localhost.conf(Remember, you can just make a file in that folder & edit it with TextEdit instead.)- On an Intel Mac, you probably want
/usr/local/etc/dnsmasq.d/localhost.conf(hint: the folders should already exist).
- On an Intel Mac, you probably want
- Add this as the only contents:
address=/.test/127.0.0.1 - Save & quit
- Create resolver directory:
sudo mkdir -pv /etc/resolversudo bash -c 'echo "nameserver 127.0.0.1" > /etc/resolver/test'
Finally: sudo brew services restart dnsmasq
We use sudo because that will let it auto-restart with the system.
Now, this should work: ping foo.test
Troubleshooting dnsmasq
- Use
sudo brew servicesto see if it’s running. Try stop/start or reinstalling.- NOTE: You will get different results when you use
sudoin front ofbrew services! Only services started WITH sudo will appear as ‘on’. Without sudo, only services started WITHOUT sudo will appear as ‘on’.
- NOTE: You will get different results when you use
- Use the Console app (standard on every Mac) and search for ‘dnsmasq’ to see if there are errors.
- Confirm the resolver is in place using this:
scutil --dns- In the output, one of the resolvers should be for ‘test’ with a nameserver of 127.0.0.1.
- If that was correct and you still can’t ping any random .test domain, your conf likely isn’t being picked up. Confirm it’s in the right spot or put the conf line in your dnsmasq.conf directly (use the
locatecommand to find it).
- If you really, really, get stuck here, don’t fret. You can just add new sites manually to your
/etc/hostsfile like this (but DO NOT alter the first few lines that are already in there or you’ll break the whole shebang):
127.0.0.1   foo.test
127.0.0.1   bar.test
127.0.0.1   baz.test
mkcert
This is a simple tool that sidesteps making custom SSL certs for your localhost by instead creating your own Certificate Authority (CA) and trusting it locally. Installation is simple.
First, install it with Homebrew. The “nss” package is required for Firefox support, which you want.
brew install mkcert
brew install nss
mkcert -install
Your sudo password will be required to finish configuration. On macOS 12 (and perhaps other versions) you’ll need to authenticate a couple more times to allow system changes.
Restart Firefox if you have it open. Then to add SSL to any site foo:
cd ~/sites
mkcert foo.test
Browsers will balk at a second-level wildcard like “*.test” so it won’t help very much to set that up. We also can’t use directory name interpolation (the %1) when defining the path to the generated certs in Apache’s conf either. So while HTTP will work for any new ~/sites folder automatically, HTTPS will always require per-site intervention.
Note that I’m putting all the certs in the root of ~/sites here, which is how I told you to set up your paths in Apache vhosts earlier. You can put them anywhere! Just update the conf to match (and restart Apache).
Test that HTTPS
At this point of the guide, if you’ve been doing it in order, you should be able to drop an index.php file in ~/sites/linc and go to https://linc.test (or whatever username you used) in a browser and have it connect.
ngrok
This service allows you to let your localhost exist on the public internet as long as it’s running. This is especially useful if your app needs to received requests from other web services (like webhooks). Otherwise, your localhost will be unreachable outside your local network.
Go download ngrok and put the unzipped file in ~/bin. You’ll need an account, too, and then follow the “Connect your account” instructions.
But let’s go a step further. Reserve a subdomain on your ngrok account, and substitute it for foo-test below.
Add this to your ~/.zprofile or ~/.bash_profile (depending on whether you use bash or zsh).
tunnel () {
   ngrok http -subdomain=foo-test -host-header=$1 80
}
Restart Terminal. Now you can use: tunnel foo.test — this starts a tunnel from your registered subdomain to the .test localhost site you specify.
Seriously: Don’t leave this running all the time. It’s extremely dangerous.
Installation: Dev Stack
Composer
brew install composerThis used to be a lot more complicated. Consider this a palette cleanser.
XDebug (2.x)
The XDebug configuration is an extension of the php.ini. While it’s possible it could be in the main php.ini, mine was at /usr/local/etc/php/{version}/conf.d/ext-xdebug.ini and I’d guess yours will be too. Note that you need to edit this for EVERY version of PHP you want to use XDebug with. Personally, I confine my XDebug activities to the latest version unless I’m truly desperate.
Here are the key bits:
- You wanna set
xdebug.remote_autostart = 1so that you can just navigate to a site normally and let XDebug trigger. - Use port 9001 since 9000 is in use by PHP-FPM in our setup.
- Set
xdebug.remote_connect_back = 0— This breaks ngrok if it’s enabled so we need it off.
Here is the final contents of my /usr/local/etc/php/7.4/conf.d/ext-xdebug.ini:
[xdebug]
zend_extension=/usr/local/lib/php/pecl/20190902/xdebug.so
xdebug.remote_autostart = 1
xdebug.default_enable=1
xdebug.remote_port=9001
xdebug.remote_host=127.0.0.1
xdebug.remote_connect_back=0
xdebug.remote_enable=1
xdebug.idekey=PHPSTORM
Your zend_extension location may vary slightly.
Restart PHP after you edit this for it to take effect.
XDebug (3.x)
The default port has changed to 9003, smartly sidestepping PHP entirely. PHPStorm also automatically co-listens on this port as of version 2020.3. Many settings changed. See the XDebug upgrade docs for more info.
DataGrip
This is my current database management app of choice, from the JetBrains suite. I used a number of “more Mac-like” apps prior to this, and you could check out Querious or Araelium as alternatives.
Setting up a connection to MariaDB on localhost is very straightforward. You want a TCP/IP connection to the Host at 127.0.0.1, username root, password blank (or whatever you set). Leave everything else alone, and Connect. I suggest saving it as a bookmark.
WordPress (optional — substitute your framework here)
Finally, the famously simple WordPress install is self-explanatory, but we’ll add a few steps for our purposes. I suggest only using 1 copy of WordPress that is symlinked between all your sites. How to accomplish this feat?
First, create ~/code/wordpress as a clone of their GitHub repository. I suggest checking out a release tag so you get an actual version, not just a random state.
Second, copy wp-config-sample.php as wp-config.php up one level into the root directory of ~/code — NOT into any particular repo folder. (Fun fact: WordPress will search its parent directory for a config too, and this means you only need one that never moves or needs to be copied / forked.)
Fill in your database information as normal, except use this for your DB_NAME: define( 'DB_NAME', $_SERVER['LOCAL_NAME'] );
Then add this anywhere in the config, changing both paths to use your username instead:
# This dynamically sets the content directory so it looks in your SITES folder instead of in the central repo.
define('WP_CONTENT_DIR', '/Users/linc/sites/' . $_SERVER['LOCAL_NAME'] . '/wp-content');
# Centralized logs.
define( 'WP_DEBUG_LOG', '/Users/linc/logs/wp-errors.log' );
# Turn on debugging.
define( 'WP_DEBUG', true );
Whenever you create a new folder under ~/sites all you need to do is symlink in the main WordPress files and copy/paste the wp-content folder as a fresh starting point. From there, you can add themes and plugins to it as normal. If you’re developing a plugin or theme, symlink the repo for it directly into the plugins or themes folder for easy management! Changing git branches updates your sites for testing! What could be better?
I create a file ~/bin/linkwp for doing the core WordPress symlinks and copying the base content folder. It contains this:
ln -s ~/code/wordpress/index.php
ln -s ~/code/wordpress/wp-activate.php
ln -s ~/code/wordpress/wp-blog-header.php
ln -s ~/code/wordpress/wp-comments-post.php
ln -s ~/code/wordpress/wp-cron.php
ln -s ~/code/wordpress/wp-links-opml.php
ln -s ~/code/wordpress/wp-load.php
ln -s ~/code/wordpress/wp-login.php
ln -s ~/code/wordpress/wp-mail.php
ln -s ~/code/wordpress/wp-settings.php
ln -s ~/code/wordpress/wp-signup.php
ln -s ~/code/wordpress/wp-trackback.php
ln -s ~/code/wordpress/wp-admin
ln -s ~/code/wordpress/wp-includes
cp -r ~/code/wordpress/wp-content .
Don’t forget to sudo chmod +x ~/bin/linkwp to make it executable, then you can just type linkwp from inside the new site folder (as in, cd ~/sites/some-name first) and it’ll do all the symlinks in one step.
Now just set up WordPress normally by visiting it in your browser.
WordPress + ngrok
There’s one last gotcha if you’re gonna use ngrok a lot: WordPress really, really cares about your site’s URL and it can hose you in unexpected ways if you try to use it BOTH via localhost and via ngrok. I strongly suggest picking which installs will be for localhost use vs ngrok use and never crossing the streams.
On the site(s) set aside for ngrok, you’ll want to set the site_url & home options in your wp_options database table to be the full URL of your site using their ngrok address rather than your .test domain. Then just don’t use that site unless you’re tunneling. This will make sure all your uploads are consistently accessed from that address! Seriously, here be dragons otherwise.
PHPUnit & PHPCS as project level tools
I highly recommend adding these tools to your project via Composer’s require-dev key: PHPUnit and PHP CodeSniffer. Why do it in your project’s Composer file and not globally install them via Composer instead? So other folks can use it without installing it globally, and to avoid version problems if you’re, say, supporting WordPress (and therefore older PHP versions).
PHPStorm
PHPStorm is likely the best PHP IDE out there, followed closely by NetBeans. Unfortunately I can only help you with the former in this guide since it’s all I’ve used for a decade.
XDebug in PHPStorm
What’s great about the XDebug setup we did earlier is that now you need to do almost nothing in PHPStorm for it to work.
- Run → Edit Configurations… → [
+] → PHP Remote Debug - Give it a name (like ‘Xdebug’) and save. No config needed
- Set break points and select “Start Listening of PHP Debug Connections” in either the toolbar or the Run menu.
There is one major downside to this configuration: XDebug is ALWAYS listening, so using CodeSniffer in tandem with it on a complex project can really slow things down and cause unwanted triggering of XDebug by PHPCS running. So far I’ve only found two workarounds. One is to turn XDebug off when not using it (blerg…) or two is to increase PHPStorm’s timeout for code sniffing to the max (30s) and pray you don’t exceed it. (Still looking for a better solution if you have suggestions).
PHP CodeSniffer (PHPCS) in PHPStorm
Besides slowing things down (in the background) when combined with XDebug as noted above, there’s one major conflict where PHPCS’s reports trigger XDebug. To resolve this in PHPStorm:
- Settings → Languages & Frameworks → PHP → Debug
- Uncheck “Break at first line in PHP Scripts”
- Uncheck both “Force break at first line when…” options
You’ll also want to set up live inspections. After adding PHPCS to Composer and running composer install you can do this:
- Preferences → Languages & Frameworks→ PHP → Quality Tools
- Expand PHP_CodeSniffer and click the ellipsis (…) button
If the PHP_CodeSniffer path and Path to phpcbf are both filled in, you’re ready to go! Composer did it.
Optional bonus config! By default, PHPStorm will flag your coding standards issues as a “Weak Warning”. Want to make them stand out a bit more? Create a new “Severity by Scope” in the same dialog as above. I suggest making “Open Files” elevated to a full “Warning” notice, which will highlight them in your editor.
Appendices
Appendix A: Why a PHP stack?
Left largely unexamined by this guide was why we’d want to prefer this stack in the first place. There’s a ton of stale animosity toward PHP left in the world, so I think it’s a disservice to the millions of hours invested into it as a platform to not take the opportunity to make two points about it.
First, it’s the best programming language & ecosystem for the web in most cases.
On the merits, for the web context, PHP generally wins. Even in narrow scenarios where other platforms outshine it, it’s fully capable. In ~30 years, it’s grown from someone’s personal convenience functions to a tremendously powerful language, which in itself is amazing and (I hope) deeply compelling evidence of how useful it is to a huge number of people.
Just consider how much of the web is built on PHP: Millions of sites built on WordPress, Drupal, Magento and more. Most of the forums that have ever existed. Thousands of apps based on the Laravel, Zend, & CodeIgniter frameworks. Wikipedia, Facebook (with an asterisk for having now kludged it into the aptly-named Hack), Yahoo, Flickr, Digg, Mailchimp, and a slew of others. By most counts, it’s running about 80% of the Internet. You’re in excellent company.
Second, it’s independent, self-sustaining open source.
Web monopolies are a clear & present threat to the open web. Not because they are evil, but because their profits are dependent on strategies that do not benefit the open web, and so they must necessarily come into conflict with it despite any best intentions. Their power, without check from the market, is therefore unencumbered and rawly directed toward activities that are, at best, ambivalent to the open web (and often much worse).
While PHP was the ward of a benevolent Zend for most of its life (which succumbed to VC in 2016 and was effectively shut down in 2019), it has proven itself a resiliently independent project. Facebook was famously built on PHP and slowly morphed it into its own fork, Hack (with its own compiler HHVM — HipHop Virtual Machine), that for a moment seemed destined to supplant the stalled PHP based on its superior performance. But PHP rallied and shipped version after version that increased performance to the point that HHVM became redundant and faded. And it seems a fortuitous outcome, since Facebook hasn’t actually provided any way for developers to learn Hack, which (I argue) was the selling point of PHP all along: the easy onboard. They open sourced HHVM to gain what they could, and then walked away when they didn’t get enough. Their goals are simply not aligned with the open web.
A capitalist company wants a financial return this quarter and may look up to a year in the future. A venture capitalist demands a 10-year financial return (usually to the ruin of any other goals). Non-profits and believers in the open web want to build things that outlive them. Few companies seem capable of bridging that chasm. If you want to build a thing that outlives you, choose your stack wisely and support it. And don’t build a company that undermines the common good.
Appendix B: PHP ecosystem cheat codes
There’s a lot I couldn’t cover in the scope of this guide, but I hope you pick up these threads to help you on your way.
- PHP 8.0 is HUGE. You should learn about it.
- Setup your SSH key, especially to use GitHub effectively.
- You should absolutely be defaulting your sites to SSL. Use letsencrypt.
- Using git on a team? Try trunk-based development. It’s important.
- CodeIgniter & Laravel are great frameworks you should investigate.
- For read-often, write-rarely apps, Varnish is critical at scale.
- Working with an API? You want Paw or Postman.
- I recommend having Atom (file editing) and Kaleidoscope (diffs) handy.
PHP support: If you’re starting a new web app, target the latest stable version of PHP as your minimum requirement. Once you support a version, it’s sometimes challenging to withdraw support. You’re unlikely to get a huge install base your first year, and PHP releases a new version annually. This strategy gives you a few years’ respite from PHP upgrades. Learn from the mistakes of your forebears and set a policy early of only supporting PHP versions under active maintenance (usually the last 2 years).
memcached is a great utility that can massive speed up your app by avoiding database queries for reads. Beware there is a different PHP tool named ‘memcache’ (no ‘D’). Avoid it! Folks screw up this difference all the time in guides and instructions all over the web. It also usually fills the same role as Redis, so if you’re already comfortable with that instead, carry on. Redis is technically superior, but memcached is easier to get started with and has equivalent performance. Another difference is that many PHP installs on shared hosting have memcached already available and integrated as a module, while Redis is, in some scenarios, a more cumbersome dependency or not available. On localhost, both are available via Homebrew (brew install memcached|redis). These are both NoSQL stores, or key-value pairs. Whereas you might think of a relational database as a stack of spreadsheets, NoSQL is more like a coat check. You know the index you want to look up, and it very quickly pulls whatever data you stored there.
A Unix text editor is something you’ll need to learn a little bit about at some point, likely nano, vim, or vi. It feels like nano has gained the largest mindshare. I learned vi first and therefore prefer it. I’ve run into systems without nano; I’ve never found one without vi. Just pay attention to which you’re in (usually indicated in the Terminal window title) as they have wildly different commands. (Comment from an emacs user in 3… 2…)
Lastly, for the reasons listed in Appendix A, avoid open source projects that are spin-offs from web monopolies that still direct their priorities (e.g. Facebook’s React or Google’s V8), especially in projects where you’re choosing the stack. Don’t invest personal resources into an ecosystem in which you are too small to matter. Put another way: Use human-scale software. The long-term ROI of hitching your wagon to monopoly-scale software is miserable.
Appendix C: The 70/10 Speedrun
So you’ve done this all before and you wanna speedrun thru 70% of this guide in 10% of the time? Alright, buckle up, and just remember: 70% means I’m skipping a bunch of stuff you might really miss.
- Homebrew
/bin/bash -c "$(curl -fsSL https://raw.githubusercontent.com/Homebrew/install/master/install.sh)"- Keep the defaults.
- git
brew install gitgit config --global user.name "Your Name"git config --global user.email "you@example.com"git config --global pull.rebase false
- Composer
brew install composer
- Create directories
cd ~mkdir bin code sites logs
- Show hidden files & file extensions
defaults write com.apple.Finder AppleShowAllFiles truekillall Finder- Finder → Preferences → Advanced → “Show all filename extensions”
- Edit PATH
- Open
/etc/paths - Append:
/User/{username}/bin - Append:
/Users/{username}/.composer/vendor/bin - Restart Terminal
- Open
- MariaDB
brew install mariadbbrew services start mariadb
- Querious: Download, TCP/IP connection, 127.0.0.1, root, password blank.
- PHP
brew install php- Restart Terminal.
- PHPStorm: Download
- dnsmasq
brew install dnsmasq- Edit
/usr/local/etc/dnsmasq.d/localhost.conf - Add:
address=/.test/127.0.0.1 brew services restart dnsmasq
- Apache HTTP
- [nginx alternative to Apache HTTP]
- Download, unzip and put in
~/bin brew install nginx- Edit
/usr/local/etc/nginx/nginx.conf(cmd+F for nginx.conf to get BOTH configs from the appendix below, this is a speedrun!) sudo nginx
- Download, unzip and put in
- XDebug
- Find & edit
ext-xdebug.ini(cmd+F for [xdebug] above)
- Find & edit
- WordPress
- Clone the WordPress GitHub repo to
~/code/wordpress - Copy
wp-config-sample.phpas~/code/wp-config.php - Set the database info as normal, except use this for the database:
define( 'DB_NAME', $_SERVER['LOCAL_NAME'] ); - Cmd+F above for ‘WP_CONTENT_DIR’ to get the other bits to add to the config (substituting your username).
- Create the
~/bin/linkwpscript above and chmod +x it.
- Clone the WordPress GitHub repo to
Now you’re ready to start making sites. Stuff we skipped:
- Multiple PHP versions.
- Setting up PHPCS etc inside PHPStorm.
- Global git hooks, aliases, and customizing our prompt.
- How to use ngrok conveniently with WordPress without hosing yourself.
- Even the slightest whiff of explanation or rationale.
And a few other niceties. Ah well, you’ll figure it out.
Appendix D: The nginx Alternative
nginx is the “new” server tech (relatively speaking). You pronounce it “engine x”. It’s currently the second-largest marketshare HTTP server, behind Apache. It’s in this guide at all because it’s what I used at my last gig for many years and so had to learn it fairly well. Apache’s direct integration of PHP via module frankly made setup a bit conceptually simpler. There are arguments for nginx’s better performance in some scenarios, and its out-of-box capability as a load balancer. Personally, I’m more concerned about stewardship: Apache is maintained by a non-profit, while nginx was bought by F5 Networks who probably wants to get that value back from it.
First, install it with: brew install nginx.
This is where things go to hell in a hand basket.
You think I’m gonna say “Then, set it as a service: brew services start nginx” and be done, but oh no, it’s far worse. For starters, its default is gonna be listening on port 8080 instead of 80 (the standard http port) because listening on port 80 requires a sudo command, which is gonna mess up Homebrew’s ability to manage it as a service. Frankly, I just wouldn’t bother, because not only that, but Homebrew’s service manager will falsely report success at restarting nginx even if there’s been a config error and nothing happened. That’s right: Homebrew’s service manager will straight up gaslight you. “I restarted!” No, you didn’t.
Not only that, but the default config just plain doesn’t work with how we’ve installed things via Homebrew, and naturally doesn’t match how any developer would want to use it on localhost anyway. And thus, we must dive into its config, god help us. If there’s one thing in this stack that’s gonna make you super frustrated, it’s gonna be screwing around in the nginx config trying to divine what’s gone wrong this time. Am I talking myself into swapping Apache back into this guide instead? MAYBE. Check back later. [Update: I did.]
Alright enough kvetching, let’s get it done. We gotta do a few things in our nginx config file:
- Set up the hand-off to PHP & some WordPress-specific rules.
- Set up our “magic”: The unique-to-this-guide stuff that’s gonna map all your
.testdomains to your webroots under~/sites.- Set the
$domainfromsite_nameusing a regular expression (pattern matching). - Use a fastcgi_param
LOCAL_NAMEto dynamically pick our webroot.
- Set the
- Configure our logging to go to our central
~/logsfolder.
I think the easiest way to explain this is to just provide a well-commented nginx.conf file. Otherwise, this is gonna turn into an nginx tutorial instead of a general localsot guide. Now, hang on.
First, take the time to really read thru this or debugging any issues is gonna be incredibly daunting. Second, bookmark the nginx docs now because you’ll need them again someday if not today. Third, test your default install of nginx first to make sure it’s actually working before you do all this fancy stuff. If you started with a broken setup, this is gonna confuse the issue impossibly. (See the commands to start/stop nginx below.)
I have my nginx config split into two pieces. One is included from inside the other. Couldn’t I just paste them together? Of course, and so can you. I keep them separate because the latter file is the one you end up messing with and troubleshooting all the time so I isolated that nonsense from the stuff I can mostly ignore. It just makes my life slightly easier. You do you.
Your nginx config is probably at /usr/local/etc/nginx/nginx.conf. (“How would I find it if it’s not there?” — See “Locate” section above.)
Mine looks like this:
user "linc" staff;
worker_processes auto;

events {
    worker_connections  1024;
}

http {
    include mime.types;
    default_type  application/octet-stream;

    sendfile on;
    keepalive_timeout  65;
    types_hash_max_size 2048;
    client_max_body_size 512M;
    server_names_hash_bucket_size 128;
    ssi on;

    gzip  on;
    gzip_comp_level 5;
    gzip_min_length 256;
    gzip_proxied any;
    gzip_vary on;
    gzip_types
    application/atom+xml
    application/javascript
    application/json
    application/rss+xml
    application/vnd.ms-fontobject
    application/x-font-ttf
    application/x-web-app-manifest+json
    application/xhtml+xml
    application/xml
    font/opentype
    image/svg+xml
    image/x-icon
    text/css
    text/plain
    text/x-component;

    include "/Users/linc/servers/nginx/*";
}
The only interesting thing here is the include "/Users/linc/servers/nginx/*"; line, which replaces a bunch of stuff in the default config. Alright so where’s the rest?
Make a new file: /Users/linc/servers/nginx/generic.conf
# called from /usr/local/etc/nginx/nginx.conf

# Our default index is always a PHP file.
index index.php;

# Make PHP a named service provider to use later.
upstream php {
    server unix:/tmp/php-cgi.socket;
    server 127.0.0.1:9000;
}

server {
    # I don't have SSL on localhost yet because I'm lame.
    #listen 443 ssl http2;
    #listen [::]:443 ssl http2;
    listen 80;
    listen [::]:80;

    # Magic part 1: Pattern match the domain name and immediately use it to define the webroot.
    server_name ~^(?<domain>.+)\.test;
    root /Users/linc/sites/$domain;

    # You can't use ~ in nginx paths, so spell them out.
    access_log /Users/linc/logs/access.log;
    error_log /Users/linc/logs/error.log debug;

    rewrite_log on;

    # Optimize a couple specific files called often.
    location = /favicon.ico {
            log_not_found off;
            access_log off;
    }
    location = /robots.txt {
            allow all;
            log_not_found off;
            access_log off;
    }

    # This is what does the main WordPress routing.
    # No PHP is touched for static content.
    # Includes "?$args" so non-default permalinks don't break when using query string in WordPress.
    location / {
            try_files $uri $uri/ /index.php?$args;
    }

    # This is the actual PHP handoff.
    # Magic part 2: Passing along $domain as $_SERVER['LOCAL_NAME'].
    # You need `cgi.fix_pathinfo = 0;` in your php.ini
    location ~ \.php$ {
            include fastcgi_params;
            fastcgi_intercept_errors on;
            fastcgi_param LOCAL_NAME $domain;
            fastcgi_pass php;
            # The following parameter could alternatively included in fastcgi_params file
            fastcgi_param  SCRIPT_FILENAME $document_root$fastcgi_script_name;
    }

    # Don't log static files and let them cache.
    location ~* \.(js|css|png|jpg|jpeg|gif|ico)$ {
            expires max;
            log_not_found off;
    }
}
Ready to start it up? To start nginx:
sudo nginx
To stop nginx:
sudo nginx -s stop
There’s no “restart”, you just need to stop then start.
Confirm nginx is listening with: lsof -i -P | grep -i listen
You should see some entries for nginx ending in localhost:80 (LISTEN).
Did nginx not want to start because the port was in use? If you were using a service like MAMP or LocalWP (Flywheel), you need to turn OFF all that before you turn on nginx. You can also use the above lsof command to figure out what’s got port 80 occupied.
Lastly, note you’ll need to restart this thing manually every time you reboot. The security on port 80 is just too tight to make this work seamlessly.